Skip to content

Posts tagged ‘Dairy Free’

Pumpkin & Ginger Spelt Flour Muffins

20110913-091002.jpg

I have been following Scandiefoodie for the past few months and have always been intrigued by her use of spelt flour in many recipe and not just in baking, Maria also uses whole spelt grains like in a recent recipe with stuffed mushrooms. Spelt is one of the oldest grains noted in history and one I have often thought about trying but sometimes it needs a little nudge and inspiration from someone else to get you on track. Maria certainly is an inspiration with her Blog and photography, my recipe was based on her Blood Orange Cakes, I thought I better use a tried and true recipe to start my spelt flour crusade and add to that as I go.

The pumpkin, ginger & spelt flour muffins came about after returning home to cold, windy wet Auckland after 5 days visiting family in warm sunny tropical Rarotonga. I wanted comfort food, it’s cold and my brain tells me I need to fuel the body with carbs and sugar but after eating fish and salad for a week I decided that the body could have what it was craving but a ‘healthier version’. I was surprised how light and fluffy these muffins were you wouldn’t guess there was no butter, sugar or white flour near them. I’m now keen to try other flavours, maybe a lime, coconut and banana next.

If you can’t find spelt flour in your supermarket you will find it at your organic store.

Ingredients – makes 8 muffins
250g wholemeal spelt flour
1/2 cup extra-virgin olive oil
3 tbsp manuka honey
1 large free-range egg
1 teaspoon baking powder
1/2 tsp baking soda
1 cup grated pumpkin (raw)
1/2 cup pumpkin seeds
100g crystallized ginger, chopped
1/2 cup apple juice
1 tsp cinnamon
1 tsp ginger powder

Method
Preheat oven to 180C and prepare 8-10 muffin cases inside a muffin tin (to hold their shape).
Combine the flour, baking powder and soda, sunflower seeds, crystallized ginger & spices in a large bowl.
In a separate bowl, whisk together the honey, apple apple juice, egg, olive oil, pumpkin .
Add the dry ingredients to the wet and stir to combine.
Scoop the batter into the prepared muffin cases and bake for 30 minutes. muffins should be puffed and feel firm when touched on top.

Gluten Free Plum & Almond Slice

I’m not one for using gluten free flours, my experience of them in cakes, breads and cookies is not that great so I tend to substitute ground nuts for the flour when making anything gluten free. Since I’m not gluten intolerant I haven’t really experimented with theses different flours so when a gluten and dairy free friend came to visit last week I stuck to what I know best and made a plum and almond slice. I used a basic Victoria sandwich cake base but increased the almond content to compensate for the lack of gluten that binds the mixture. I also substituted the butter for an olive oil spread which is like a margarine to make it dairy free also.

The result is a dense cake slice which holds well in the fridge and we found it to taste even better the next day, although there wasn’t too much if it left. The sweet almond cake against the tart plum is a perfect combination and would work well with apricots too, other stone fruit tend to be too large for decorating the cake.

Ingredients
125g butter or Olivani (olive oil spread)
125g sugar
200g ground almonds ( or 150g ground an 50g course ground for texture)
2 eggs
6-8 plums
30g sliced almonds
1tsp cinnamon
Corn flour to dust tin

Method
Pre heat oven 180C.
Oil and corn flour a 22cm loose bottom tart tin.
Place butter & sugar in a bowl and beat with an electric whisk or good old fashioned wooded spoon until light and fluffy.
Add one egg at a time and whisk in between both additions.
Fold in the grounds almonds with a metal spoon so not to loose all the air that has been beaten in.
Spoon mixture into prepared cake tin and evenly.
Cut plums in half and remove stones.
Press plums into the cake mix and sprinkle sliced almonds over the top. Dust plums with the cinnamon.
Bake in oven for 35-40 minutes until golden and firm like cake. The cake will rise but shrink slightly when cooled.
Allow to cool slightly before removing from the tin.
Serve as is or with some yoghurt, ice cream or whipped cream

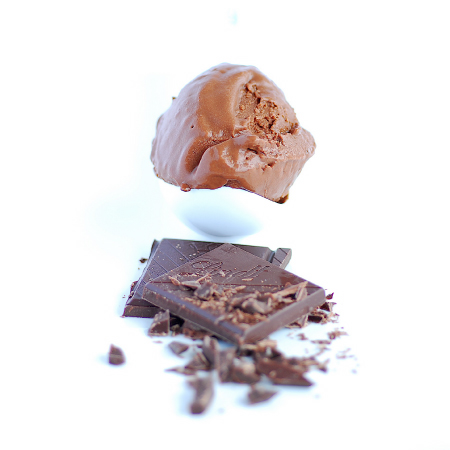
Dairy Free Chocolate Ice Cream made with Rice Milk

Playing with new ingredients as well as a new lens!

rice-ice1

A friend has someone visiting who is on a dairy, wheat, soy and egg free diet so it was a bit of a challenge to make a sweet treat for her. She knew I had been making ice cream lately from yoghurt and asked if it would be possible to make ice cream from rice milk. I said I would test run a recipe and then pass it along if it was successful. Of course I passed on the first batch of rice milk ice cream too! Since I couldn’t make a custard base with eggs I opted for a Gelato style ice cream, thickened with corn flour. The rice milk, which I had never tasted before, was quite sweet so there is very little sugar added to the recipe and the richness of the 70% chocolate over shadows the rice milk flavour.

It was a great success by everyone, not just the young lady on the special diet.

I have also been playing practising with my new macro lens and trying out new techniques, some are working well but other things I took for granted with a wider lens are proving frustrating but I suppose it is just a case of practise make perfect.

Ingredients

  • 500ml rice milk
  • 50g sugar
  • 100g 70% cocoa chocolate, chopped
  • 3 tsp corn flour/ corn starch

Method

  1. Mix 50ml of rice milk and corn flour together till smooth.
  2. Heat the rest of rice milk in a pan.
  3. Just before the milk boils remove from the heat and stir in the corn flour.
  4. Once thoroughly mixed return pan to the heat and cook on a low heat, stirring constantly for a few minutes until milk thickens. It is important to cook out the flavour of the corn flour otherwise the gelato will taste floury.
  5. Remove from the heat and add the sugar.
  6. Pour into a bowl and add the chocolate and stir continuously until the chocolate has melted.
  7. Chill in fridge overnight or until completely cold.
  8. Transfer the mix into the ice cream maker and process according to manufacturers instructions.
  9. Keeps well for a week (if you can keep it that long!) but after that I find it forms too many ice crystals in a domestic freezer.