Skip to content

Search results for 'mozzarella'

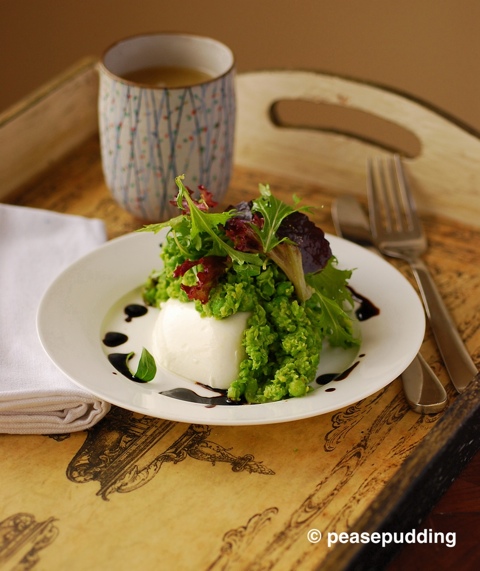
Homemade Mozzarella & Slow Food Waitakere Group

20110821-064319.jpg

A Sunday doesn’t get much better than having a group of foodies over for a mozzarella making workshop at the Gourmet Gannet. Making Mozzarella is fun at the best of times but that increased ten fold with the bunch from the Slow Food Waitakere group. For those local to Auckland and interested in locally produced food its a great group to get involved in, our next outing we will be visiting Kazuyo and Eri (Eri is a Japanese chef) and the menu is based on Japanese high Cuisine as make in Nara.

So how do you top a fun morning making mozzarella? Well you all pop along to the newly opened Tasting Shed on State Highway 16 for leisurely lunch. There we enjoyed dishes such as rolled pigs head, braised lambs neck on a bean puree, roasted quail, cauliflower fritters with cauliflower a la Greque and for those of us who had a sweet tooth a churros con Chocolat and a citrus rice with brûlée crisp top. I’m glad it’s my local since there is so many dishes I would like to try.

Here’s the recipe for mozzarella in one hour. The key is to use pasteurized milk, it doesn’t work with ultra pasteurized or homogenized.

Ingredients
makes 3 medium balls
2 litre milk
1 tsp citric acid
½ tsp salt
½ tsp rennet (Renco brand from supermarkets) or 1/4 Mad Millie Vegetarian tablet
1ml calcium chloride

Method
1. In a pan add;
2 litres full cream milk (Meadowfresh farmhouse, A2, NOT homogenized)
½ tsp salt (not iodized salt)
1ml calcium chloride
1tsp citric acid (dilute with 1 tsp water)
2. Gently heat to 32C, use a water bath if you are not confident with the milk.
3. Add;
½ tsp rennet or 1/4 tablet of veg rennet (diluted with 1tbsp water)
4. Stir well and leave for 20 minutes to allow curds to form.
5. Cut curds into 1 cm cubes with a knife.
6. Heat gently to 41C slowly forming the curd into a ball with a slotted spoon. This should gradually come together into a ‘milk brain’ shape. Do not force or squeeze the curd together. Do not over heat. Remove from heat.
7. In a small pan heat some sterilized water to 70C.
8. Place a ball of curd into the hot water (inside a sieve for ease of lifting out) to cook & stretch the curd. Roll around with a wooden spoon. It should start to become stretchy/sticky.
9. Take the ball out of the hot water and stretch (do not pull, let gravity do the work) then fold, then shape into a ball shape.
10. Plunge into a bowl of ice cold water. This helps cool the cheese quickly and retain its shape.
11. Eat immediately or it can be retained in the fridge in a sealed container for a few days only. Remember, it has no preservatives!

(note; To acidic will be too stretchy. Not enough acid, will snap so use exact citric acid offered)

Jamie’s Fifteen Gooey Mozzarella, Smashed Herb Peas and Salad

20110711-091209.jpg

This is my take on Jamie’s dish Gooey Burrata with Smashed Herb Peas which we had as part of his degustation menu at Jamie’s Fifteen in Cornwall last month. It’s one of the dishes that stood out most even though it was rather simple in concept but that’s what I love about Jamie’s cooking. We do not have Buratta cheese here in NZ so I went for the softest mozzarella I could find which was almost as good. It’s quite an easy dish to put together and you can get all the elements ready in advance then just reheat the peas and mozzarella through just before you are ready to serve. It looks rather impressive and creative no one will guess how easy it was, although I’m sure Jamie’s was a little more complex than this.

The pic below the recipe is of me sitting in Fifteen overlooking Watergate Bay.

Ingredients

  • 1/2 mozzarella ball per person
  • 1 cup of milk
  • 1/2 cup frozen petite peas per person
  • handful of salad leaves or watercress per person
  • Handful fresh mint and parsley
  • zest of one lemon
  • Nob of butter
  • salt & cracked pepper
  • balsamic glaze

    Method

  • Oil the base of a pan large enough to fit all the mozzarella cheese without each piece touching.
  • Put the milk and mozzarella in the pan over a very low heat just to warm the milk. Do not let it boil as this will cook and melt the mozzarella too much, you just want it to soften slightly.
  • Pour boiling water into a pan with the peas, bring to the boil then drain the peas.
  • Add the zest, butter and herbs to the peas and blend half till smooth and the rest leave whole to give a varied texture
  • Season with salt & pepper.
  • Mix some balsamic glaze to the salad leaves.
  • To assemble first scoop the warm mozzarella out onto a plate, pile on the peas and then the salad and finish off with an extra bit of balsamic glaze around the plate.
  • You can add a piece of pan fried fish too if you want to make it a more substantial meal.

    20110713-100553.jpg

  • Making Mozzarella in One Hour!

    I like to make my own cheese at home and have had success with Ricotta, Halloumi and Feta but Mozzarella has always evaded me and I have never been able to get it to stretch. It is also the most expensive to buy here in NZ at around $15 for 100 grammes so it is well worth mastering! The Muriwai Girls who I cook with wanted me to do a class and show them how to make Mozzarella so I knew what I needed to do was go back and see NZs cheese guru who first showed me how to make cheese, Katherine Mowbray. I’m sure Katherine won’t mind me calling her the cheese guru, since she has been making and teaching people to make cheese for many years and is also involved in cheese making awards. She holds classes all over New Zealand, which are such a pleasure to go to as Katherine has a wonderful way of presenting to a crowd.

    Anyway, Katherine fixed my problem, my curds weren’t acidic enough to ‘stretch’ and she just happened to be showing a new method that allows you to make Mozzarella in an hour with the help of a little addition of citric acid. Normally the curds are left at least a day in the fridge to create their own acid but this method requires measuring the PH to ensure it is ready to create Mozzarella with. Katherine calls this Mozzarellia since it is not the ‘official’ way of making it.

    I made 3 batches with this new method which all came out perfect so I knew it was time to show the girls my new found trick. Thanks Katherine. Six girls, 2 litres of milk each and they all work out perfect and we had a lot of fun at the same time, I highly recommend it. Below are a few action shots and the recipe.

    If you are too nervous to make it yourself, look for one of Katherine’s classes if you are in NZ or if you are in Auckland give me a shout.

    Ingredients & Method – makes 3 medium balls

    1. In a pan add;

    • 2 litres full cream milk (not homogenized)
    • ½ tsp salt (not iodine salt)
    • 1tsp citric acid (dilute with 1 tsp water)

    2. Gently heat to 32C, use a water bath if you are not confident with the milk.

    3. Add;

    • ½ tsp rennet (diluted with ½ tsp water)

    4. Stir well and leave for 20 minutes to allow curds to form.

    5. Cut curds into 1 cm cubes with a knife.

    6. Heat gently to 41C slowly forming the curd into a ball with a slotted spoon, take your time the process should take about 15 minutes so it stabilises properly. This should gradually come together into a ‘milk brain’ shape. Do not force or squeeze the curd together. Do not over heat. Remove from heat.

    7. In a small pan heat some sterilized water to 70C.

    8. Place a ball of curd into the hot water (inside a sift for ease of lifting out) to cook & stretch the curd. Roll around with a wooden spoon. It should start to become stretchy/sticky.

    9. Take the ball out of the hot water and stretch (do not pull, let gravity do the work) then fold, then shape into a ball shape.

    10. Plunge into a bowl of ice cold water. This helps cool the cheese quickly and retain its shape.

    11. Eat immediately or it can be retained in the fridge in a sealed container for a few days only. Remember, it has no preservatives!

    (note; To acidic will be too stretchy. Not enough acid, will snap so use exact citric acid offered)

    Making Feta Cheese and a Simple Greek Salad

    20120107-171953.jpg

    One rainy day over the Christmas break a few girlfriends and I decided to make some cheeses, feta, Camembert and Mozzarella. We buy milk from a local farmer by the 10 liter bucket so it makes sense to make cheese in bulk. The mozzarella I have made many times before and there is a recipe here, the Camembert I will blog about once it has matured over the next few weeks. The good thing about the feta is that it is ready to eat straight away or you can hold it in a brine solution for a few weeks.

    It produces a nice soft creamy feta, not crumbly like traditional but perhaps that is because it was so fresh and it didn’t get a chance to age it. I’m also running a feta cheese making workshop at Gourmet Gannet in March for anyone interested and also take private group booking in Auckland.

    I have not included a recipe for Greek salad, it is how you see it, either sliced or chopped tomatoes, cucumber, onion, feta cheese, a drizzle of olive oil, add some olives if you wish. I have a few more recipes with feta coming next, in the meantime here is how to make feta if you would like to give it a go, it’s quite easy.

    Equipment
    You can buy all the cheese equipment from Mad Millieif you are in New Zealand
    Cheese thermometer
    Feta cheese mould or you can use a sift and muslin cloth
    Large heavy bottom pan
    Long knife
    Slotted spoon
    Sterilizing tabs
    Sterilize all equipment you are going to use. You can use the sterilizing tabs used for sterilizing babies bottles, found at local supper markets. Follow manufacturers instructions.

    Ingredients
    2 litres full cream milk (not homogenized)
    ½ tsp rennet (diluted with ½ tsp water)
    8 grain of Flora Danica Culture or Lipase
    1/2 tsp salt

    Method
    In a pan heavy bottom pan add the milk
    Gently heat to 32C
    Add the Flora Danica Culture or Lipase.
    Dilute the rennet with a tablespoon of water.
    Add the rennet to the milk and stir well.
    Leave for 20-30 minutes to allow curds to form.
    Cut curds into 1 cm cubes with a knife, then cut curds across the centre.
    Leave the curds to sit for half and hour, folding them over each other every couple of minutes.
    Ladle the curds into the feta moulds and allow to drain overnight in the fridge. Placing the moulds on a wire rack so the whey drains through.
    In the morning make a brine solution of 20% salt to water.
    Place the feta in the brine solution.
    Feta can be eaten after 12 hours soaking or left to mature for up to two three weeks.

    Jamie’s Fifteen Restaurant, Watergate Bay Cornwall

    A trip to the west coast of Cornwall wouldn’t be complete without a visit to Jamie’s Fifteen ( http://www.fifteencornwall.co.uk/) on the beach at Watergate Bay. We booked months in advance of our trip to ensure our space and I counted the days till we went, it was to be one of the highlights of our trip and it didn’t disappoint.

    A window seat gave us a view over the bay and we watched the surf crashing in and the sun setting as we grazed our way through our five course degustation menu. As the sun dipped below the horizon we thought about it rising in Muriwai and wondered how our house sitters and pussycats were fairing on the other side of the globe.

    So what did we eat at Jamie’s Fifteen? Mussels with fennel and cherry tomatoes was our appetizer but I dived in so quickly that I forgot that I was going to take a photo of each courses. I didn’t take a menu either so I am going on memory for the descriptions so I hope I do it justice Jamie.

    Veal Tartar with a lemon zest rocket salad (no photo)
    Gooey Buratta, Italian smashed peas & little leaves

    20110529-043521.jpg

    Roast Duck Tortellini in a duck broth (no photo)

    Crispy fillet of John Dory, crushed Cornish potatoes, asparagus and a Sorrel Aoli
    30 day aged Angus Eye Fillet with borlotti beans

    20110529-045440.jpg

    Chocolate Nemesis Cake, Clotted Cream and Strawberries
    Lemon Mascapone Cake with poached Apricots

    20110529-045452.jpg

    20110529-045501.jpg

    Handmade Truffles and coffee

    I could eat this menu all over again, it was perfect in every way as was the service and the wine pairing. I have promised to recreate the buratta dish (mozzarella poached in cream) and the John Dory for family this week so I may even post my taking on these dishes if I get the chance to capture them. My family, not like my poor suffering hubby, aren’t used to my photographing their dinner so we shall see.

    For those who don’t know Fifteen is a global social enterprise and charity founded by Jamie. Heart of it is a chef training programme with a mission ‘to empower young people and give them a second chance’.

    Now on to France and a few local restaurants in Perigord.

    Creole Quinoa Jambalaya

    The first bag of quinoa I had in the cupboard was almost up to it’s expiry before I got around to using it but once I got into the swing I was pretty well hooked. I love the texture and the nutty flavour it offers a dish, it’s perfect for warm salads and works perfectly as an alternative to rice in Jambalaya. I’d seen the recipe on a product advertisement for Ceres Quinoa and decided to try it. I have changed the method slightly and added a few more ingredients like paprika and tumeric which I associate with Paella. I found that rather than cook it all in one pot which is typical for Jambalaya the quinoa is better cooked on it’s own to help it ‘sprout’ then added to the rest of the dish for the final stages of cooking.

    Creole Jambalaya originates from the French Quarter of New Orleans. It evolved by the Spanish attempting to make paella in the New World, where saffron was not readily available due to import costs and tomatoes became the substitute for saffron. As time went on, French influence became strong in New Orleans, and spices from the Caribbean changed this New World paella into a unique dish.

    Ingredients – serves 4

    • 1.5 cups Quinoa (I used the red variety)
    • 4 chicken legs (thigh and drum separated)
    • 12 large prawns
    • 1 onion, diced
    • 3 cloves garlic, finely chopped
    • 1 red pepper, de-seeded and sliced
    • 1 yellow pepper, de-seeded and sliced
    • 1 can of chopped tomatoes
    • 2 cups of stock
    • Handful of fresh oregano or thyme, chopped
    • 2 tsp sweet paprika
    • 1 tsp turmeric
    • 1/2 tsp chilli flakes or 1 fresh chilli, chopped
    • handful of fresh parsley, chopped
    • salt & pepper to season
    • Olive oil for frying

    Method

    1. Rinse quinoa in cold water, then drain. Add grain to a pan with 4 cups of water and bring to the boil then simmer for 8 minutes until the grain has ‘sprouted’. Drain in a colander and put aside.
    2. Place a little oil in a large frying pan and add the chicken, browning on all sides.
    3. Remove the chicken from the pan and add the onion, garlic and peppers and cook on a medium heat for 5 minutes until the onions are opaque, stirring constantly.
    4. Return the chicken to the pan and add the tomatoes, stock, oregano, paprika, chilli and turmeric.
    5. Bring to the boil, cover with a lid and simmer on a low heat for 20 minutes.
    6. Stir in the prawns and the quinoa and return the lid and cook for a further 5 minutes. The dish should still have some liquid, if it doesn’t add a little water.
    7. Check the chicken and prawns are cooked, add chopped parsley and serve immediately.

    It does re-heat well if you want to make it in advance, the quinoa holds better and doesn’t absorb all the liquid liek rice would.

    Upcoming Classes & Events at the Gourmet Gannet – 2011

    Cheese Making – Halloumi, Mozzarella & Ricotta

    Cake Decorating – learn how to decorate a kids novelty 3D birthday cake

    Tapas – Make and enjoy a range of Tapas

    Creative Salads – How about a Moroccan Quinoa Salad? Or Mediterranean Lentil Salad?

    Creole Cooking with a Twist – Quinoa Jambalaya, Pineapple & Mango Ice cream

    Savoury Pie Workshop – Come and make traditional pork pies or gala pies with a hot water pastry crust.

    Homemade Sausages – No additives or fillers, just great taste!

    Chocolate & Plain Croissant – Ever wanted to make your own croissants?