Skip to content

Posts from the ‘Main Course’ Category

Malaysian Egg Curry & Return of The Gannets

Where have you gone my lovely sunshine? For one day you graced us with your presence and back into hiding you went, all you left behind was a glowing red line across the back of my neck, evidence that you truly had visited . Our beautiful Gannets were happy as the sun shone, they played on the blustery sea air, swooping and diving, showing off to their mates, they are home again for the season. When the wind blows onshore we can hear their calls from our deck, they know summer is on it’s way even if the sun doesn’t always play it’s part in the deal.

As the weather changed again the salads went to the back of the fridge and a quick spicy Malaysian curry made an appearance for lunch. The recipe is slightly adjusted from Alice Hart’s book, Vegetarian to suit the ingredients I had on hand, it’s one of my favourites because it is so quick to prepare and full of fragrant flavours.

Ingredients – 4 portions

Serve with Basmati or Jasmine rice

8 soft boiled eggs

1 Tbsp coconut oil

4 spring onions, thinly sliced

3 cloves garlic

2 inch fresh ginger, grated

1 tsp cumin seeds, ground

1 tsp coriander seeds, ground

1 tsp turmeric powder

1 chili, chopped

400ml chopped tinned tomatoes

2 Tbsp tamarind paste

100ml coconut milk

1 Tbsp brown sugar

salt to season

large handful fresh coriander, chopped

Method

In a large frying pan heat the coconut oil over a medium heat.

Add the spring onions, ginger and garlic and saute for 2 minutes.

Add the ground cumin, coriander, turmeric, chili & tomatoes to the pan and saute for 5 more minutes.

Stir in the tamarind paste, coconut milk and brown sugar, season with salt to your taste.

Simmer for 5 minutes until the sauce starts to thicken and then add the boiled eggs.

Cook for a few more minutes to warm the eggs through.

Scatter with fresh coriander and serve with rice

The Asparagus Table – La Vignarola – Italian Spring Soup, Wholemeal Asparagus Tart and Egg Asparagus Soldiers

Some of the simplest things in life are best, how often have you heard that remark?  The long awaited asparagus season is here in New Zealand and keeping it simple with asparagus certainly highlights the veg at it’s best. My favourite way to eat asparagus is just lightly steamed served with eggs ‘anyway’ and lashings of butter,  try a fun quirky way of serving the spears with your soft boiled egg using them as ‘dunking soldiers’. As I was eating the asparagus and boiled eggs my mind had already wandered onto truffle oil drizzled into the shell…watch out shopping bill, truffle oil may well be in the next basket.

The Italian spring soup La Vignarola is perfect for show casing not only asparagus but also lovely spring vegetables of podded peas and broad beans. If you can’t find them freshly podded and don’t have them sprouting away in your garden, snap frozen are pretty convenient and taste great too. A simple tart of asparagus with sour cream and mustard is easy for anyone to whip up, I made a wholemeal pastry but you can always buy pre bought if you are short on time or don’t have ‘pastry fingers’.

La Vignarola – Spring Soup

Ingredients

4 spring onions, sliced

2 bunches asparagus

200g frozen peas, defrosted

200g broad beans, podded (you can use frozen)

200g jar marinated artichoke hearts

3 cloves garlic

2 cups vegetable stock

Large handful each of parsley & mint, finely chopped

Zest and juice 1 small lemon

100g shaved Pecorino to serve

Olive Oil

Salt & Pepper

Method

Cut the woody ends off the asparagus spears and discard, then cut spears into three.

Place a little olive oil in a large saucepan over a medium heat.

Add the spring onions and garlic and cook for 5 minutes.

Add the asparagus, podded broad beans and stock to the pan and cook for a further 5 minutes.

Add the peas, artichokes juice and zest of the lemon to the saucepan and season with salt & pepper.

You can add some of the artichoke marinade to the soup also if you wish, tasting as you do.

Add the parsley and mint.

Bring the soup to the boil then remove from the heat and serve immediately, you want the veg to be crisp and green.

Serve the soup with shaved pecorino and crust bread

Asparagus Tart – serves 6

Ingredients – pastry
110g butter

180g wholemeal flour
1 egg

2 Tbsp iced water

pinch of salt

Method – Pastry

Place flour, butter and salt in the bowl and whiz until it resembles breadcrumbs.

Add the egg and water and knead together briefly to form a dough.

Rest the pastry in the fridge for 20 minutes.

Roll pastry out to fit tart tin and press into place, trim edges off pastry.

Ingredients – Tart Filling

1 bunch spring asparagus

250g sour cream

2 large free range eggs

2 heaped tsp whole grain mustard

salt & pepper to season

ground black pepper

Method – Tart Filling

Pre-heat oven at 180C & grease & flour a 20cm loose bottom tart tin.

Remove the woody ends from the asparagus and cut spear in half.

Whisk together the sour cream, eggs and mustard and season with a little salt & pepper.

Pour mixture into the pastry base.

Lay the asparagus half spears on top of the mixture in pastry case, alternating tip and base as in picture.

Grind some black pepper over the top of asparagus.

Bake in oven on a lower shelf (to crisp pastry base) for 35-40 minutes until tart is set and golden.

Remove from oven and allow to cool for 10 minutes before removing tart from mould.
Serve warm of chilled

Hola Mexico! Chipotle Chili Tamarind BBQ Sirloin & Grilled Salmon with Lime, Ginger & Coriander

It’s definitely time to get out the BBQ, it’s been five month since it saw light of day, the only problem is our summer doesn’t seem to be towing the line. Slammed by southerly wind, showers and the odd blink of sun this weekend my great plans of a Mexican BBQ turned into grilling indoors in the cast iron skillet instead. It’s a ritual this time every year, the New Zealand weather turns on a few warm days, we pack away our winter clothes knowing damn well the weather Gods haven’t finished toying with us and it all turns to custard again. Realistically the weather doesn’t truly settle till December , at that stage the jandels (flip flops) are on and no socks for 5 months. I’m just hoping the weather might give me a little reprieve next week when I am running the Mexican BBQ workshop, at least I have a back up plan and plenty cast iron frying pans if doesn’t behave itself.

Mexican Grilled Salmon with Lime, Ginger & Coriander

Ingredients – serves 2-4

  • 2-4 salmon fillets (one per person)
  • Juice of 2 limes
  • 1 tsp tamarind
  • 2 chili, finely chopped
  • 1 inch fresh ginger, grated
  • 1/2 small bunch Coriander, finely chopped
  • 1/2 tsp sea salt
  • 2 tbsp olive oil
  • 1 tsp brown sugar

Method

  • Remove skin from the salmon and any pin bones.
  • Place all the ingredients except for the salmon in a bowl and mix together.
  • In a flat bottom dish place the salmon pieces and pour over the marinade. Marinate for 20 minutes, do not leave it much longer as the lime and tamarind will ‘cook’ the salmon.
  • Heat the BBQ to medium high and flame grill the salmon for two minutes on each side or cooked right through if you prefer. Place the salmon pieces onto a serving dish.
  • Put the remaining marinade into a small pan and bring to the boil. Pour over cooked salmon on serving dish and serve with corn tacos & tomato salsa.

Chipotle Chili Tamarind BBQ Skirt Steak

Ingredients – serves 4

  • 800g Skirt Steaks (or sirloin if you prefer)
  • 1tps black pepper corns, ground
  • 1 tsp cumin seeds, ground
  • 2 Tbsp brown sugar
  • 1-2 chipotle (I use tinned-La Morena) chili, finely chopped
  • Juice of 2 limes
  • 1 tsp tamarind paste
  • 2 Tbsp Japanese soy
  • 2 Tbsp olive oil

Method

  • Combine all the ingredients except for the skirt steak together in a bowl.
  • Place the skirt steak into flat dish and pour over the marinade and covering both sides. Marinate the steak for a minimum of one hour (it can be left for several).
  • Heat the BBQ to medium high and flame grill the steak on one side for 2 minutes and then turn over and marinate on the other side also for two minutes.
  • Remove steak from the heat and wrap in tin foil and let the meat rest for ten minutes.
  • Slice thinly and serve with corn tacos and tomato salsa
  • Heat the remaining sauce in a pan and serve over sliced steak

Roast Pumpkin with Mexican Green Mole

We have gone all Mexican the past few weeks, homemade tacos, Mexican salads, salsa and moles galore. Hubby thinks he’s in food heaven enjoying the meat laden tacos with the token greenery scattered on top, after all eating tacos means you get to design your own. When I saw this dish in Tomasina Miers book which arrive a few weeks ago I just had to make it, the vibrant orange pumpkin against the Herby green pumpkins seeds cried out to be made. All the spices and flavours I knew I would love it and declared that we were having Mexican again for dinner. When I lifted the lid off the serving dish at the table hubby looked like a goldfish in a bowl, jaw open with a vacant expression, uttering “Err, is that the side dish”. “No Dear” I replied in my English school mam voice. A hesitant scoop went onto his plate next to a rather large pile of soft tacos. But guess what? He loved it after the first taste, declared it didn’t need any meat it was a perfect dish. So there you go, it pays sometimes to keep my trap shut and not react to his initial lack of enthusiasm,  I must have been having a positive hormone day! Therefore I can recommend this as a ‘complete dish’ even for those meat lovers but it would work well next to a spicy meat dishes or marinated fish which you can find in Tomasina’s book, Mexican Food At Home. The original recipe has quinces in it but that would have pushing it a little to far for hubby mixing fruit and savoury, I have also altered a few ingredients to suit availability here.

Ingredients

2kg butternut pumpkin, peeled & de-seeded

1/2 tsp ground cinnamon

1 tsp cumin seeds

olive oil

1 Tbsp balsamic vinegar

For the Green Mole (Pipian)

3 Chipotle Chili (you can buy tinned La Morena brand here)

3 pickled Jalapeno chili (La Morena)

120g pumpkin seeds

4 cloves garlic

1 onion, peeled and quartered

700ml stock

2 large bunches coriander

1 large bunch basil

olive oil

Method

Preheat oven to 200C

Cut the butternut pumpkin into bite size chunks and place in a roasting dish.

Add a good splash of olive oil, ground cinnamon, cumin seeds & balsamic vinegar to the roasting pan and toss through the pumpkin.

Place in the oven and roast for 30 minutes. You want them to be cooked but not falling apart.

Remove the pumpkin from the oven once cooked.

To make the Green Mole place the pumpkin seeds on a baking tray and toast in the oven for 5-10 minutes.

Transfer them to a food processor then add the chillies, onion & garlic and blitz till the texture of a chunky pesto.

Add the coriander & basil and blend again till the herbs are finely chopped. You may need to add a few tablespoons of water to loosen the paste if it doesn’t blend properly.

In a large frying pan over a medium heat add a good splash of olive oil and heat.

Add the green mole and cook for another 5 minutes.

Add the stock to make a sauce and cook for a further 5 minutes.

Then add your roasted pumpkin to the sauce and gently stir through the green mole with out breaking up the pumpkin. Heat through if the pumpkin has cooled.

Serve with soft warm tacos.

Salmon Quinoa Cakes

20120725-214119.jpg

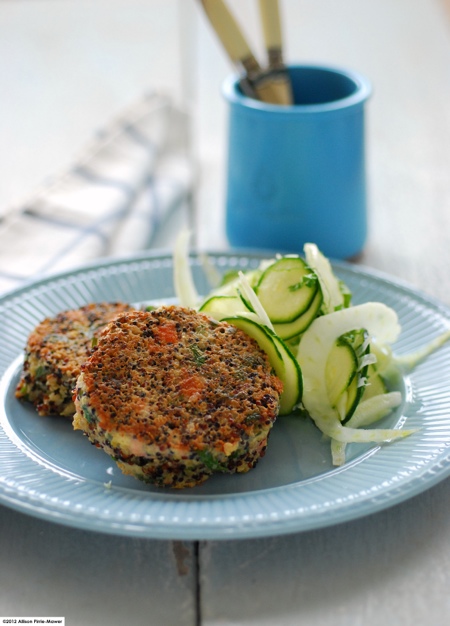
We love pulses and grains in our house and not because we are trendy, hippy or health freaks, as you will gather from all the cake recipes on my blog. Although I have been know to pass through all those phase at on point in time! We eat pulses because they are a great vessel for flavours and bring new texture to dishes. We often swap a spicy lentil braise for spuds and there is nothing more satisfiying than a bean and sausage casserole bubbling away on a winter’s evening but as the saying goes “you can take the lass out of Liverpool but not the Liverpool out of the lass” and therefore I will always crave a ‘chip butty’ with lashings of butter and fluffy white bread now and don’t forget the side of mushy peas. There are a lot of quinoa burger recipes out there but I doubt I would get hubby to enjoy a ‘pure’ one without a little of something extra in it and I don’t mean his favourite malt whiskey either. My quinoa cakes have a good dose of lime, fresh coriander and soy to boost the flavour and compliment the salmon. Serve the salmon quinoa cakes with a fresh mint yoghurt and a fennel and raw courgette salad dressed with a simple lime juice, olive oil and salt dressing.

Ingredients
Make 6-8 small cakes
50g Quinoa (I used mixed coloured grain)
200g Pacific salmon fillet, skinned & pin boned
2 Tbsp cornmeal (or breadcrumbs)
handful fresh coriander, finely chopped
handful fresh parsley, finely chopped
zest & juice of 1 lime
1Tbsp soy sauce
1 clove garlic, finely chopped or crushed
2 small free range eggs

Method
Put the quinoa grains into a pan with 3 cups of water, bring to the boil then simmer for 8 mins until the quinoa tail sprouts and the grains are soft but still have a bite.
Drain and cool quinoa place in a large bowl.
Cut the salmon into 1 inch squares and place in bowl with quinoa.
Add all the other ingredients to the bowl and stir through, it will be a little liquidly from the eggs.
Place a large frying pan over a low heat, I prefer to use a cast iron pan.
Add a splash of oil to the frying pan.
To make the cakes a nice shape use a cookie cutter and place it in your pan.
Add approx 2 tablespoons of mixture into the cookie cutter and cook for half a minute so the egg seals the bottom then remove cookie cutter carefully. The mixture should hold.
Repeat to form 4-6 cakes, depending on the size of your pan. You want to have enough space to flip them over so less is better and make two batches.
Once the cakes have cooked for about 3 minutes you will see they start to firm up from the base and the salmon turns pale pink and cooked.
Gently flip the cakes over, any mixture that falls away push back into the cake, it will re-set as the egg cooks on the second side.
Cook second side 3 minutes, both sides should be golden.
Remove from the pan and repeat with rest of mixture.
Serve warm.

Mushroom and Fennel Ragout with Cheese Herb Scones

20120617-091436.jpg

Winter is well and truly here in New Zealand, we have experienced our first frost in the valley and icy winds blasting from the snow capped south. But no need to grumble, it’s the perfect photo opportunity on these winter mornings, there’s nothing more beautiful than a blanket of frost on the ground as a sunny morning dawns. The snow brings winter sport, trips to the mountains, the thrill of snowboarding and of course the desire to cook hearty winter meals.

As an alternative to the classic meat stews, try a mushroom ragout, it’s quicker to make but still offers that satisfying, warming fullness we associate with a regular stew. High in protein, mushrooms are a good vegetarian alternative and since they are coming into season here in NZ also offer great value for money.

Ingredients for Scones
200g self raising flour
80g butter
pinch of salt
Pinch of cracked black pepper
100g grated cheddar cheese
150ml of milk
1 tblsp Dijon mustard
Handful of thyme

Ingredients for Ragout
800g white or brown button mushrooms, washed and halved
1 large fennel bulb
Olive oil
1 tsp fennel seeds
3 cloves of garlic, crushed
2 tsp Dijon mustard
150ml sour cream
100ml water

Method for Scones
Preheat oven to 180 degrees centigrade.
Remove the fennel fronds from the bulb and chop finely.
whisk the mustard into the milk.
Place flour, butter, pepper and salt into a bowl.
Rub butter and flour together until the mixture resembles fine bread crumbs. Or use a food processor.
Add half the grated cheese and fennel fronds and mix through.
Form a well in the centre of bread crumb mix and add the milk, kneed gently to form a soft dough.
Transfer dough onto a floured board and press the dough out with hands (rather than using a rolling pin) until it is about 2cm thick.
Use a round cookie cutter to cut out the scones or slice the scones, it should make 8
Put scones aside till ragout is done.

Method for Ragout
Quarter the fennel bulb, remove core and thinly slice.
Add a few tablespoons of olive oil to a large oven proof frying over a medium to high heat.
Add the halved mushrooms and fry till they go brown and caramelized on the edges. You may need to do this in two batches if your pan isn’t big enough.
Lower the heat to medium and add the garlic, sliced fennel and fennel seeds and cook for about 5 minutes, stirring several times.
Add the sour cream, water and mustard, stir and simmer for 5 minutes.
Plop the scones on top of the ragout, sprinkle with the rest of the cheese and bake for 20 minutes.
If your frying pan can’t be put into the over transfer ragout to a casserole dish before putting the scones on top.
Serve with some steam green beans.

Spicy Sticky Braised Belly Pork

20120528-210502.jpg

I was contacted by a representative of 100% NZ Pork to see if I would be interested to help promote New Zealand pork by creating a recipes with their produce. In our house we only ever buy New Zealand free range pork, so this was an easy yes to promoting locally grown produce rather than imported.

100% NZ Pork also have a great website, Extraordinary Kitchen supported by well known Kiwi chefs offering more recipes and information on our local pork products.

Belly pork is one of my favourite cuts of pork, I know many people shy away from it because of the fat content but it adds so much more to a dish and tenderness to the cooked meat. Personally I would rather eat good honest fat that hasn’t been processed than the stuff hidden in processed food and lets face it, your not going to eat it every day.

I love this Chinese style spicy sticky pork, it has few ingredients and is easy to prepare and if you don’t want it too hot cut down the chillies in the recipe. It’s perfect served with steamed rice and vegetables. Any left overs, if by a small miracle there are any, is perfect shredded and stuffed into a roll for lunch the next day.

If you like this recipe I also have a belly pork cassoulet recipe and pork and mushroom stroganoff pie recipe coming soon too! I do love winter for its hearty food, I think that’s my Northern English background taking over.

Ingredients
500g New Zealand Belly Pork
Vegetable oil
2 cups water
1 Cinnamon stick
6 star anise
2 -4 dried chillies, finely chopped
2 inch piece of fresh ginger, peeled and grated
2tbsp dark soy sauce
2tbsp white vinegar
2 tbsp brown sugar

Method
Cut the belly pork into 1 inch cubes.
Add 2 tablespoons of vegetable oil to a heavy based or cast iron frying pan, and heat over a medium high heat.
Add the belly pork cubes to the pan when the oil is hot.
Cook the belly pork on all sides until golden brown (approx a minute on each side).
Add the grated ginger, star anise cinnamon stick and chillies to the pan and fry for a few more minutes. Stand back as the chili fumes can make you eyes water!
Add the water and bring to the boil, then turn heat down to low and place a lid on the frying pan.
Cook on simmer for 45 minutes until pork is tender but still firm.
Remove the pork from the pan and set aside.
Whisk together the sugar, vinegar and soy sauce then add to the pan, boiling the liquid until it reduces by half.
Add the pork back to the pan and continue to cook until the juices reduce and become sticky. Stir constantly at this stage.
Serve the pork with steamed rice and a side of steamed Bok Choi.

Soy Salmon with an Avocado, Lime, Wasabi Salsa

20120409-113104.jpg

I hope you all enjoyed a long weekend break over Easter, for me it was nice to be home for four days and the sun shone all weekend long. The last of our summer days I think, the gannets have all but a few flown from the colony, leaving just me behind till they return next year.

We often cook this dish on the BBQ as part of several dishes but Easter weekend we decided to have it on it’s own for our Sunday brunch served on a piece of whole grain toast, very decadent. It’s a really versatile dish that can be served as an entree on its own, as a main with steam veg or even as a canapé on little crispy croutons

Salmon cooks well on the BBQ, you need to remove the skin though as it will stick to the BBQ grill. The method is the same if you decide to cook it on your barbie. The marinate of soy and sugar caramelizes beautifully on the flame grill but here I cooked it in my cast iron pan and it was almost as good, I wasn’t going to fire up our charcoal BBQ for just one fillet so it was a good compromise.

I usually only buy one 4inch wide salmon fillet between the two of us, although I really enjoy salmon it can be quite rich and a small amount goes a long way so I have based my recipe on one fillet but you can easily double the quantities if you are cooking for more.

Ingredients for two
1 Salmon filet, sliced in half length ways
2 tbsp soy sauce
1 tsp brown sugar
1 ripe avocado
1 tsp wasabi paste
juice and zest of 1 lime
2 spring onions, finely sliced

Method
Remove the skin from the salmon, it marinates better this way.
Warm the soy and sugar together so that the sugar dissolves.
In a small flat bottom container pour the soy and sugar, add the skinned salmon.
Marinate for 15 minutes turning every couple of minutes.
While the salmon is marinating make the avocado salsa.
Cut the avocado in half and remove the stone and scoop out the flesh.
Place the avocado flesh in a bowl with the lime zest and juice and wasabi paste.
Mash together to a lumpy texture rather than smooth purée.
Add the sliced spring onions and season with salt and pepper to taste, put aside in fridge.
Heat a cast iron or heavy bottom frying pan with a tablespoon of veg oil and place over a medium heat.
Once the pan is hot put the salmon fillets in and cook for 1 minute, turn the fillets over.
Brush the cooked side with more marinate and cook the second side for 1 minute.
Turn the fillet over and repeat the process on both sides, brushing with marinate and cooking each side for another minute (cooking time altogether 4 minutes).
Test the fillets are cooked to your liking, I prefer them a little undercooked.
Serve with the avocado salsa.

Braised Five Spice Lentils with Duck & Porcini Sausages

20110724-035004.jpg

Duck & Porcini sausages, as soon as I saw them on Rubys List which is an online butcher in New Zealand, I just had to try them. Ruby’s List offers only meat that has been pasture raised or free-farmed, as they say ” meat sourced from cows, pigs, lamb, deer and poultry that have led good lives in clean, open air. The sausages were like non I had tried before, rich and meaty with a defined Porcini taste. If Ruby’s List takes their time to source good ethically grown produce I knew I wanted to spend time and effort on the dish I would put together. Having been in France recently I had the idea of a traditional lentil meat stew but I have also influenced having eating at Cafe Hanoi and their five spice also came to mind. So that is how I ended up with this dish. Something traditional with a few exotic ingredients.

Ingredients – serves 4 with mash or polenta
1 cup brown lentils
2 cups chicken stock
1 small onions
1 inch fresh ginger
2 cloves garlic
1tsp five spice
1tsp course ground black pepper
1tsp pomegranate molasses
1/4 cup red wine
Handful chopped coriander to garnish
8 Rubys List Duck & Porcini sausages (or any game style sausages)
10 cloves of roasted garlic (optional)

Method

To roast the garlic, place whole bulbs in the oven on 180C for 15 minutes. Remove and once cold peel off the skin carefully to keep cloves in tack. I often throw a few bulbs of garlic in the oven when it is on to use later in other dishes, it keeps well in the fridge for a week.

Place the onion, garlic, ginger, five spice a glug of olive oil in a blender and blend to a paste.

Fry the paste in a little olive oil for a few minutes, stirring all the time.

Add the wine and simmer for a few minutes then add the stock, roasted garlic and lentils and cook over a low heat for 25-30 minutes until the lentils are soft.

Fry the sausage in a separate frying until brown all the way round then add them to the lentils.

Add the molasses and coriander and cook on a low heat, with a lid on the pan to retain the moisture for a further 10 minutes. If the lentils go dry add some water so there is always a sauce.

Serve with polenta or mash.

Chicken Lap Lap – Polynesian Style Chicken with Taro

We have just spent a week visiting family in Rarotonga, Cook Islands where we really did just relax at the beach and not get distracted by our everyday life of emails, blogging, Twitter, Facebook since we had no access to it. I thought I was going to blog while I was there, Facebook pictures of me lounging on the beach and tweet about local cuisine…how reliant we become on our media outlets and to find you have none came as a shock…but not for long. After the first morning the IPad and mobile phone where soon replaced with a good book, snorkeling in the lagoons, taking a siesta, shopping at the local food markets, sampling new cuisine and sun set cocktails.

While there I bought a book on South Pacific cuisine called Me’a Kai by Robert Oliver which is beautifully presented with glorious photos of local dishes, the people and scenery. I have never cooked Pacific cuisine even though we have access to a lot of the ingredients in Auckland so this Sunday, upon our return, we headed to Avondale market were we knew we would be able to buy Taro root and Taro leaves which are common to South Pacific dishes. The has a great combination of spices with a creamy coconut base. We also had the pleasure of sharing this meal with Sue from Couscous & Conscious who is currently staying in Auckland.

Ingredients
Base

  • 2 large banana leaves
  • 5 cups grated taro root
  • 200ml coconut milk
  • 2 cups spinach, wilted & chopped
  • 4 tomatoes, quartered
  1. Pre heat oven to 180C.
  2. Boil or steam the banana leaf to soften and lay one leaf in the bottom of a large greased casserole dish.
  3. Cover banana leaf and casserole dish with grated taro root and pour over 100ml of coconut milk. Place the spinach on top of the taro.
  4. Place the quartered tomatoes around the side of the dish.
  5. Pour 100ml of coconut milk over everything and cover with another banana leaf and the casserole dish lid.

Chicken Marinade

  • 1 free range chicken, cut into 8 pieces
  • Juice of 1 lime
  • Vegetable oil
  • 1/2 tsp turmeric
  • 1.5 tsp coriander seeds
  • 1tsp cumin seeds
  • 1/2 tsp cardamom seeds
  • 1 chili
  • 2 cloves garlic
  1. Place chicken pieces in a large bowl.
  2. Grind spices in a mortar & pestle then add chili and garlic and grind together to form paste.
  3. Add lime juice and oil to the paste then pour over and coat chicken pieces completely.
  4. Place chicken in a roasting dish.
  5. Put both the taro base and chicken tray in the oven to roast for 40 minutes. After 40 minutes remove the casserole lid and top banana leaf off the taro and roast for a further 20 minutes or until chicken is cooked.

Sauce

  • 5 cloves garlic
  • 2 tbsp thinly sliced ginger
  • Juice and zest of 2 small limes
  • 1tbsp flour
  • 200ml coconut milk
  • 2 spring onion, finely sliced
  • Salt & pepper
  1. While chicken is cooking make the sauce
  2. Place a tablespoon of oil in a pan with the ginger and garlic over a low heat.
  3. Cook for several minutes then add the flour to form a paste and cook for a few more minutes.
  4. Add the coconut milk, lime juice and zest and spring onions and cook for 10 minutes over a low heat.
    Season with salt and pepper.

To assemble arrange the chicken pieces over the taro base and then pour over the coconut sauce just before serving.