Skip to content

Posts from the ‘Entrees’ Category

Sweet Corn, Pea & Halloumi Herb Fritters

DSC_0093A nice easy brunch recipe that is quick to put together if you always have corn in the cupboard or peas in the freezer like we do. The key to this recipe is to use lots of herbs, so where I note a large handful I mean LARGE, not a few leaves. Think Jamie Oliver, wildly tearing heads of herbs off their stalks and using the lot, no point saving the rest for a rainy day, chances are they will wilt away in the fridge. Unless of course you have your own garden supply, mine has dwindled with our new resident hens who have got into my herb garden and made it into a dust bath. The fencing will go up this weekend to keep them out and new herbs will be planted. Speaking of our hens, when we adopted them one of the hens, Beryl, had a baby chick which we were excited about the prospect of more eggs once it grew up. Well the chick has become a teenage, it’s a bit like the ugly duckling story because our cute baby chick is starting to resemble a Pea Hen (hopefully not Peacock) and not a egg laying chicken! They say hens will adopt any eggs or chicks if they are broody and it appears that is what Beryl has done. Below is a picture of ‘Pea’ very timid and hiding under our deck.

DSC_0065

Makes approx 16 small fritters
Ingredients
4 large free range eggs (or 5 small)
200g garden peas (frozen is fine)
400g tin of creamed corn
Large handful of fresh parsley, mint and coriander, finely chopped
Zest of 1 lemon
2 Tbsp plain flour
200g halloumi, diced small
Salt & Pepper to season
Vegetable oil for frying
Method
In a large bowl whisk together the eggs.
Add the frozen peas (they will defrost quickly), tinned corn, herbs & lemon zest to the whisked eggs.
Sift the flour over the vegetable & herb mix in the bowl and stir through until combined.
Add the diced Halloumi and stir through again. We add the halloumi last so it doesn’t break up.
Season with salt & pepper, the mixture should be fairly thick at this stage, if not add another tablespoon of flour..
In a large frying pan over a medium heat add  2 tablespoons of vegetable oil.
Spoon a tablespoon of mixture into the pan to make each fritter, add another three making sure fritters have enough space to flip them over.
Cook fritter for approximately 2 minutes until golden brown then flip over with a spatula.
Cook second side for the same length of time.
Remove fritters from the pan and place on a tray covered with kitchen roll to soak an excess fat.
Add a little more oil to the frying pan and cook more fritters, repeat process till all mixture is cooked.

Cape Malay Pickled Fish

20120602-121037.jpg

We like our pickles in Britain, whether on a cocktail stick with cheese, jazzing up a butty (sandwich), part of a ploughman’s salad or accompanying a roast but this was a new dish introduced to me by a South African friend, Cape Malay Pickled Fish. Having eaten plenty Ceviche and Ika Mata and being a pickled ‘anything’ fan I had no doubt that I would like this dish as we discussed the ingredients but I wasn’t expecting the fish to be cooked before it was marinated! So if you are introducing anyone to marinaded pickled fish this is probably a good place to start if they are squeamish about trying ‘raw’ fish. The curry spices give it an interesting twist and it has the makings of a traditional pickle so for those pickled vegetable fans out there this is one its to try.

Ingredients
500g firm white fish, filleted
2 onions, thinly sliced
3 cloves garlic, thinly sliced
2 tbsp brown sugar
1 cup white vinegar
10 black peppercorns
6 cloves
1 small cinnamon stick
2 tsp coriander seeds
2 tsp cumin seeds
4 allspice berries
1 tbsp curry powder
Sea salt
Vegetable oil

Method
Cut the fish into 2 inch size pieces.
Put a few tablespoons of vegetable oil into a large heavy based frying pan over a medium heat.
Fry fish on both side until cook through, you don’t use any flour as this will make go gluggy in the marinade.
Once cooked lay the fish into a glass casserole dish and put aside.
Add all the other ingredients Into a small pan over a medium heat and bring to a simmer. Cooking for 6 minutes until the onions are cooked but still firm.
Pour the hot marinade over the fish and place in the fridge.
Marinade for several hours or if you have the time overnight so all the flavours infuse better.

Soy Salmon with an Avocado, Lime, Wasabi Salsa

20120409-113104.jpg

I hope you all enjoyed a long weekend break over Easter, for me it was nice to be home for four days and the sun shone all weekend long. The last of our summer days I think, the gannets have all but a few flown from the colony, leaving just me behind till they return next year.

We often cook this dish on the BBQ as part of several dishes but Easter weekend we decided to have it on it’s own for our Sunday brunch served on a piece of whole grain toast, very decadent. It’s a really versatile dish that can be served as an entree on its own, as a main with steam veg or even as a canapé on little crispy croutons

Salmon cooks well on the BBQ, you need to remove the skin though as it will stick to the BBQ grill. The method is the same if you decide to cook it on your barbie. The marinate of soy and sugar caramelizes beautifully on the flame grill but here I cooked it in my cast iron pan and it was almost as good, I wasn’t going to fire up our charcoal BBQ for just one fillet so it was a good compromise.

I usually only buy one 4inch wide salmon fillet between the two of us, although I really enjoy salmon it can be quite rich and a small amount goes a long way so I have based my recipe on one fillet but you can easily double the quantities if you are cooking for more.

Ingredients for two
1 Salmon filet, sliced in half length ways
2 tbsp soy sauce
1 tsp brown sugar
1 ripe avocado
1 tsp wasabi paste
juice and zest of 1 lime
2 spring onions, finely sliced

Method
Remove the skin from the salmon, it marinates better this way.
Warm the soy and sugar together so that the sugar dissolves.
In a small flat bottom container pour the soy and sugar, add the skinned salmon.
Marinate for 15 minutes turning every couple of minutes.
While the salmon is marinating make the avocado salsa.
Cut the avocado in half and remove the stone and scoop out the flesh.
Place the avocado flesh in a bowl with the lime zest and juice and wasabi paste.
Mash together to a lumpy texture rather than smooth purée.
Add the sliced spring onions and season with salt and pepper to taste, put aside in fridge.
Heat a cast iron or heavy bottom frying pan with a tablespoon of veg oil and place over a medium heat.
Once the pan is hot put the salmon fillets in and cook for 1 minute, turn the fillets over.
Brush the cooked side with more marinate and cook the second side for 1 minute.
Turn the fillet over and repeat the process on both sides, brushing with marinate and cooking each side for another minute (cooking time altogether 4 minutes).
Test the fillets are cooked to your liking, I prefer them a little undercooked.
Serve with the avocado salsa.

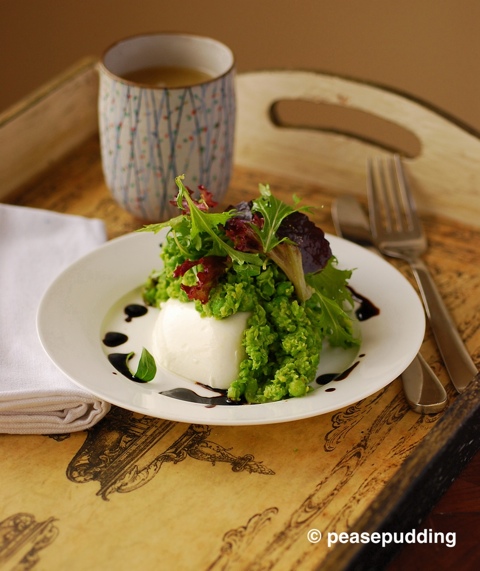
Jamie’s Fifteen Gooey Mozzarella, Smashed Herb Peas and Salad

20110711-091209.jpg

This is my take on Jamie’s dish Gooey Burrata with Smashed Herb Peas which we had as part of his degustation menu at Jamie’s Fifteen in Cornwall last month. It’s one of the dishes that stood out most even though it was rather simple in concept but that’s what I love about Jamie’s cooking. We do not have Buratta cheese here in NZ so I went for the softest mozzarella I could find which was almost as good. It’s quite an easy dish to put together and you can get all the elements ready in advance then just reheat the peas and mozzarella through just before you are ready to serve. It looks rather impressive and creative no one will guess how easy it was, although I’m sure Jamie’s was a little more complex than this.

The pic below the recipe is of me sitting in Fifteen overlooking Watergate Bay.

Ingredients

  • 1/2 mozzarella ball per person
  • 1 cup of milk
  • 1/2 cup frozen petite peas per person
  • handful of salad leaves or watercress per person
  • Handful fresh mint and parsley
  • zest of one lemon
  • Nob of butter
  • salt & cracked pepper
  • balsamic glaze

    Method

  • Oil the base of a pan large enough to fit all the mozzarella cheese without each piece touching.
  • Put the milk and mozzarella in the pan over a very low heat just to warm the milk. Do not let it boil as this will cook and melt the mozzarella too much, you just want it to soften slightly.
  • Pour boiling water into a pan with the peas, bring to the boil then drain the peas.
  • Add the zest, butter and herbs to the peas and blend half till smooth and the rest leave whole to give a varied texture
  • Season with salt & pepper.
  • Mix some balsamic glaze to the salad leaves.
  • To assemble first scoop the warm mozzarella out onto a plate, pile on the peas and then the salad and finish off with an extra bit of balsamic glaze around the plate.
  • You can add a piece of pan fried fish too if you want to make it a more substantial meal.

    20110713-100553.jpg

  • Mini Courgettes with Cumin & Sumac Dressing

    Happy St Patricks Day! I’d like to say I had made something green for the occasion but truth be know I have been too busy and away in Sydney on business so have not been near the kitchen all week. I did manage to don a green dress today though in honour.

    Aren’t these courgettes such darlings, I couldn’t resist buying them from the farmers market when I saw them. It would have been a shame to chop them up too and looses their cuteness so I just sliced them down the middle and fried the flat side on a griddle. I did not cook both sides because they are so small it was sufficient to just cook the one side and it mean they kept their crunch and colour too. I mixed all the dressing ingredients together and poured it over the courgettes while they were warm and served them immediately. They are a perfect side dish for any meat or fish.

    Ingredients – Dressing

    • 1/4 cup olive oil
    • juice of 1 lemon juice
    • 1 tsp sumac
    • 1 tsp cumin seeds
    • 1 clove garlic, finely chopped

    Fennel, Cucumber, Seafood Salad

    I’m having a fennel month and not because I have a glut in my garden either. I did have some that grew into five foot high triffids and I didn’t do anything with it so for my penance for not looking after and harvesting my fennel I have to buy it at $2.50 a bulb. Note to self, pay more attention to what’s growing in the garden next hear as it is likely that the fennel seeds have blown everywhere.

    This is an Ottolenghi inspired salad, a book gifted to myself that arrived last week which I just adore and can honestly say every other page makes me swoon. After my previous post on fennel salad I just knew this would be to my taste also. We ate it as a light main in larger quantities than shown in the photo but this was all that was left for my photo shoot and I did have to sneak this bit away before it was all consumed. I’ll take that as a compliment?

    Ingredients – 4 entree, 2 main

  • 2 fennel bulbs
  • 1 telegraph cucumber, halved down middle & sliced
  • 3 spring onions, thinly sliced
  • juice and zest of one lemon
  • 2 cloves garlic
  • 2 tbsp dill, chopped
  • 2 tbsp flat leaf parsley, chopped
  • 2 tbsp coriander, chopped
  • 1 mild chili, chopped
  • 4 tbsp olive oil
  • 8-12 prawns depending on size
  • 300g baby squid, cleaned
  • 1 tbsp sumac spice
  • salt & pepper
  • pomegranate seed to garnish

    Method

  • Trim base and tops of fennel then slice width ways as thinly as possible.
  • In a bowl mix the fennel, cucumber, chili, onion, lemon juice, garlic, dill, parsley and 2 tbsp of olive oil. Combine all the ingredients.
  • Place a heavy cast iron frying pan over a high heat and allow the pan to get pipping hot.
  • Mix the prawns and squid with the remaining oil and add to the pan in small batches. Cook them one minute on each side or until just cooked.
  • Transfer the squid to a chopping board and slice into rings. Add both prawns and squid to the salad and toss through.
  • Add the coriander and sumac, season with salt and pepper, toss through again and serve immediately.
  • You could also use the salad without the fish as a side dish to accompany ofncutsbof fish.
  • Green Gazpacho Soup with Goats Cheese & Walnuts

    The good thing about making New Years food resolutions in New Zealand is that they are easier to keep living in the southern hemisphere. I can’t even begin to imagine turning over a new (lettuce) leaf and eating salads and soup in a UK mid winter but here it has been so warm this year one craves fresh and light dishes.

    I first tasted gazpacho in Spain when I was 17 and thought it was dreadful eating cold soup but that was before I developed a passion for food. Now it is probably one of my favourite, it is so fresh and light for those really hot days. I couldn’t resist adding my favourite goats cheese to it and a few walnuts for some crunch and of course some crusty bread for dipping!

    This recipe is Really easy to make by whizzing everything together in a food processor, pushing it through a colander and chilling it down.

    I have also been fiddling with my new photo software on my iPad……jury’s out on the new format I chose but it good to experiment.

    Ingredients

  • 2 cucumbers, sliced lengthways and de-seeded
  • 1 green pepper/capsicum, halved & de-seeded
  • 4 green tomatoes
  • 2 spring onions
  • 1clove garlic
  • 1 slice sour dough bread
  • 2 tbsp of white wine vinegar
  • 3tbsp olive oil
  • salt & pepper for seasoning
  • goats cheese & walnuts optional for garnish

    Method

  • Soak the bead with the vinegar and olive oil.
  • Rough chop the pepper, cucumber, tomatoes, garlic and spring onion and place in a food processor or blender.
  • Add the bread also to the food processor/blender and blend until smooth.
  • season with a little salt and pepper and the strain all the ingredients through a colander or course sift. You want texture to come through but to leave any bigger bits behind.
  • depending on how thick the soup is you can add some water or ice cubes if you want to chill it down quickly.
  • chill in fridge for several hours for the flavours to improve then serve with goats cheese and walnuts.
  • Shopping On An Empty Tummy & A New Year Food Promise

    A post with no recipe! Only a picture of a what was left of my yummy car park picnic snack.

    We have all done it….most of us probably do it once a week at least….food shopping on an empty tummy. We all know how lethal it is on our purse and waistline but with busy lives there is often no avoiding it unless one is ultra organised and since I’m not a bulk shopper or a hoarder I never have the healthy hunger buster snack option at work to enjoy just before leaving the office to tide me over. This evening was the perfect example, leaving the office 5 hours after my last morsel of food was consumed at lunch time, a small one too since I am on the New Years let’s eat healthy kick…sound familiar hey? Before Christmas I would have just bought one but no, I am determined…. for a few weeks at least.

    By the time I was half way round the shop my subconscious was zooming in to all the chocolates, pastries and baked goods perfectly presented and packaged for a quick snack to keep you company on the drive home and stop that grumpy feeling one gets when hungry. When I am hungry I turn into an irrational ogre and grump at everyone and everything till I have eaten, thankfully I am not alone in this experience, girlfriends say they’re the same, even Sasa has named it Hanger (food hunger).

    So I decide to look for a healthy snack to keep me going, after all I have a 40 minute drive before I get home. There isn’t much to be had other than muesli bars loaded with sugar, fruit or nuts…boring! There is some pot of humous with yummy India spices on top but dipping bread or crackers into it would deaf the point. But I have a plan, I buy some pre washed carrots to go with the humous, it will be perfect but….ah I forgot I’m in a super market car park not a cafe or park. Thankfully this was an under ground car park so it was rather dark so no one could see me furtively dipping a whopping big carrot into a pot of humous and munching away happily. So girls don’t be persuaded by the cash counter snacks when hungry, well at least for the first few weeks of the New Year, just have a picnic in your car…..oh and don’t tell my boss since my work car is meant to be ‘food free’.

    Lime Kelp Prawns with Sea Lettuce Soba Noodle Salad

    For something a little lighter after all that Christmas food! Although this is probably more appealing to those in the Southern Hemisphere enjoying sunny warm days rather than those in the Northern Hemisphere. If like my family in the UK you are snowed in you will probably prefer something heartier than a noodle salad but perhaps keep it in mind for next summer. I image many people in the UK will be whipping up a turkey meal from the leftovers of the monster bird cooked on Christmas day? I have only attempted once to cook a turkey in NZ for Christmas after feeling rather homesick for a traditional dinner… never again, it was so hot in the kitchen baking the dam bird I just didn’t feel like eating it afterwards. This year we had Rick Steins scallops on a smoked pepper salad, rabbit in a sherry sauce and for dessert a black forest trifle. What did you all have for Christmas lunch?

    Ingredients – serves 4 main or 6 entree

    • 200g soba noodles
    • 16-18 large prawns
    • 1 cup Pacific Harvest Sea Lettuce
    • 1 tsp Pacific Harvest Lime Kelp
    • 1 tbsp Pacific Harvest Dulse Flakes
    • 3 spring onions
    • 1 red pepper
    • 100g needle mushrooms or any readily available mushroom (thinly sliced if not using needle mushrooms)
    • 2 tsp sesame oil
    • Juice of 1/2 lemon
    • handful fresh parsley leaves
    • handful fresh coriander leaves
    • salt & pepper for seasoning
    • 4 tbsp olive oil

    Method

    1. Half fill a medium size pan with water then bring to the boil.
    2. Place sea lettuce & dulse flakes in a sift and dip into the boiled water and allow to soak for 2 minutes. Remove from water then strain and cool. Place in a large bowl.
    3. Add the soba noodles to the boiling water and cook for 4-6 minutes or until al dente, on a low simmer. Drain noodles, then run briefly under cold water to cool them and drain again. Place in same bowl as sea lettuce.
    4. Thinly slice the red pepper and spring onion and add to the bowl with noodles, sea lettuce & dulse.
    5. Briefly fry the mushrooms in a frying pan with a little oil, then add to the bowl with above ingredients.
    6. To make the salad dressing take a large mortar & pestle and grind the parsley & coriander leaves. Add the lemon juice, sesame oil and 2 tbsp olive oil. Season with a pinch of salt & pepper and grind further until you get a lovely green paste. Add 2 more tbsp olive oil and grind again. If you don’t have a mortar & pestle you can use a blender, whiz stick.
    7. Add the dressing to the bowl with the noodles and toss through to coat all the ingredients. Divide the noodle salad between four serving bowls/plates.
    8. In a small bowl add 1 tbsp olive oil & 1 tsp lime kelp. Coat the prawns with this mixture.
    9. In a cast iron or non stick frying pan fry the prawns on each side till pink and just cooked through (approx 1 min each side). Arrange prawns on top of the cold noodle salad and serve.

    Note, the salad can be prepared in advance and kept in the fridge several hours prior to serving. The prawns can be served hot or cold.

    Green Lipped Thai Style Mussel Fritters

    Sorry photo didn’t come out too clear!

    Mussel fritters are one of those traditional Kiwi icon dishes that seem to have been around forever, probably because mussels have always been easily accessible and cheap and because of their size a very substantial meal too. I decided to jazz them up a bit for pre- dinner canapés I was taking to friends by adding some Thai spices to them and it worked a treat. The sauce in the middle is a spicy peach but unfortunately I did not note the ingredients down for this but just kept adding a bit of this and that while they were cooking. I do intend to re do once the stone fruit is in season and I will certainly share it with you then.

    Ingredients

    • 300g green lipped mussel meat (about 24 mussels)
    • 2 Spring onions, finely chopped
    • Handful coriander, chopped
    • 1 tsp Lemongrass paste
    • 1 chilli, chopped
    • 2 egg whites (you could make a aoli with the yolks to dip in)
    • 1tbsp plain flour
    • Salt & pepper to season

    Method

    • In a large pan place 2 cups of water and bring to the boil. Put as many mussels into the pan as possible and cover with a lid. Steam mussels until the shells open fully (about 5-8 mins). Discard and that do not open. Repeat until all mussels are cooked.
    • Remove mussel meat from shell and pull off ‘the beard’ which is the hairy bit that attaches the shell to the rock, discard these.
    • Finely chop the mussels and place in a large bowl.
    • Add the spring onions, coriander, lemongrass & chilli to the mussels and combine.
    • Sift the flour over the mussels and combine.
    • Season with salt & pepper.
    • Whisk the egg white till fluffy and the.
    • Fold the egg whites into the mixture.
    • In a non stick or cast iron frying pan add a tablespoon of oil.
    • Add a small bit to taste test and cook on both sides, check taste for flavour and re-season if required.
    • Use a teaspoon to measure canapé size fritters into the frying pan, flatten them slightly and cook on both sides till golden. Don’t forget your mussels have already been cooked so they will not take too long. Leave enough space in between fritters so you can flip them over.
    • You can always make burger size too and enjoy this in between a burger bun with salad!