Skip to content

Posts from the ‘Relishes & Preserves’ Category

Breakfast of Tomato Kasundi, Aubergine & Poached Eggs

DSC_0060 (1)

We received a huge box of fruit and veg for Christmas from one of Hubby’s clients, most of which we managed to eat except for the tomatoes. The only reason we didn’t get through all the tomatoes was because I had been gifted extra tomatoes by a friend a few days early. Kasundi was the solution before the fruit went past it’s best. Kasundi is an Indian tomato relish/chutney which is fragrant and spicy but you can moderate the heat if you make your own. I prefer a spicy hot kasundi and can eat it with anything and as you can see I have no problem with spicy food for breakfast either, they say it kick starts the metabolism.

There are tons of tomato kasundi recipes on the internet, I’m not ‘reinventing the wheel’ here so I will just direct you to the one I used from Taste.com.au  with a few tweaks. Here they used tinned tomatoes whereas I used 6 large fresh beef tomatoes which would have been the equivalent of 800g tinned. I didn’t cook my tomatoes for the length of time stated in their recipe either, I only cooked it for 40 minutes. By this time most of the liquid had evaporated. Tinned have a lot more liquid hence needing a longer cooking time. I divided the kasundi between 3 x 200g sterilised jars. You can use it straight away or keep it for ages in the sealed jars. You can use kasundi as a relish on burgers, as a chutney with papadums and I think it would also go really well with grilled or BBQ fish.

So once you have your kasundi you can start creating new dishes…..

To make the breakfast dish, I cut a rather large aubergine/egg plant into 8 wedges lengthways. Added 2 tablespoons of olive oil to a large frying pan and fried the aubergine over a medium heat on both sides until brown. Approx 3 minutes a side. Then add 1/3 of the kasundi ( 1 jar) to the frying pan, lowered the heat and simmered for 15 minutes. Poach some eggs to go with it. This will serve 2-3 people as a main dish. Serve the poached eggs on top of the kasundi and add some fresh coriander. Enjoy the spicy kick for breakfast!

Vanilla Roasted Strawberries with Cinnamon Meringues & Thumbprint Shortbread Biscuits

You know it is strawberry season in our house, not by the abundance of strawberries in the fridge or fruit bowl but by the morning wake up call. As the season approaches the wake up call on hubby’s IPhone changes and sings out ‘Strawberry Fields Forever’, by the Beatles. The strawberry fields are calling him back to work, spring is here and its time to sell these little ruby jewels into market. it’s also a little ironic that I am a Liverpudlian and he chooses a Beatles song. Do you have a favourite alarm call and does it change with your mood? When things have been a bit tough I have been known to have Lily Alan playing in the morning, her songs always make me laugh but also drive everyone bonkers all day singing them.

Continuing on with my roasted strawberry series from last week, here are two other recipes to use your roasted strawberries with. Serving them with cinnamon meringues and whipped cream is the perfect summer dessert or make a thumbprint biscuit a little more decadent, instead of using jam add a roasted strawberry to the biscuit after they are baked.

Cinnamon Meringues
Ingredients
3 Egg Whites
100g icing sugar
1/2 tsp cinnamon powder
Method
Pre-heat oven to 120C and line two baking trays with greaseproof paper.
Place egg whites in a clean large bowl with a pinch of salt.
Whisk egg whites to soft peak.
Sift in icing sugar gradually while whisking.
Once the meringue is whisked to stiff, sprinkle the cinnamon over it in the bowl.
Taking a dessert spoon, scoop out a spoonful of meringue covered in some cinnamon and drop onto the lined baking tray.
Each scoop will have varying amounts of cinnamon but this adds to character.
Bake in the oven for 50 minutes. They should be crisp on the outside and soft/chewy in the centre.
Allow to cool and serve with cream & strawberries.
Store meringues in an airtight container.

Thumbprint Biscuits
Ingredients
2oz or 60g sugar
4oz or 120g butter
4oz or 120g plain flour
2 oz or 60g ground almonds
1 egg
1/4 tsp vanilla paste or seeds of 1/2 bean
Method
Pre-heat oven to 200C
Place sugar, flour, butter, ground almonds into a food processor and whiz them until they resemble breadcrumbs.

Add the egg and pulse slowly until the mixture comes to a dough, do not over mix at this stage.

Remove biscuit dough from the food processor and divide 12 equal portions.

Roll each portion into a ball and place onto a nonstick baking tray and pres the centre down with your thumb, almost all the way through.

At this stage you would add a blob of jam for thumbprint biscuits but I have baked mine naked so I can top them with strawberries.

Bake for 20 minutes until golden brown, remove from the oven and allow to cool.

Top each one with a roasted strawberry and some of the strawberry syrup from roasting.

Eat immediately otherwise the strawberries will make the biscuit soft. Store biscuits separate to strawberries if not eating them all at once!

Aubergine Jam served with Goat Feta and Toasted Bread

I made this aubergine jam to go with the Moroccan sausages I made last week, not only did it go well with the sausages it also made a fine spread on toasted bread, as pictured. I even had some left over which I  took to work and enjoyed it warm with some wild rice for lunch. So if the aubergines are plentiful in your area at the moment it is well worth whipping up a batch of this jam for it versatility!

Ingredients

  • 3 tbsp olive oil
  • 1/2 onion
  • 1 large aubergine (egg plant)
  • 3 cloves garlic
  • 1 tsp caraway seeds
  • 1 tsp coriander seeds
  • 1 cinnamon stick
  • 1 small chili, whole
  • 400g canned tomatoes
  • 1 tsp brown sugar
  • 1 tbsp white vinegar
  • salt & pepper to season

Method

  1. Place the caraway seeds and coriander seeds in a dry frying pan and cook for 2 minutes until aromatic.
  2. Finely chop onion.
  3. Dice aubergine to 1 inch pieces.
  4. Heat oil in a large heavy based pan and add onions. Cook on a medium heat into opaque.
  5. Add the aubergine and cook for 3 minutes.
  6. Add the remaining ingredients and cook over a low heat for 1 hour. Add a little water if the mixture starts to stick to the pan. After an hour the jam should be thick.
  7. Season to taste and once cooled place in a container and refrigerate. Should keep for a week.
  8. Serve on toast with a slice of goats feta or use as an accompaniment to my Moroccan sausages or grilled fish or chicken breast.

Grapefruit Curd Recipe

The grapefruit are falling off the trees here in New Zealand in abundance at present, a friend handed me a whole shopping bag full of them from their garden and I knew I wouldn’t be able to eat them all before they started to ruin. As much as I love grapefruit there is only so many I can eat in one day and I haven’t managed to convince P yet to create a new cocktail with them but I am hoping to bump into Nigel at Curious Kai this weekend so maybe he will have some ideas!

Lemon curd has always been a favourite of mine and I didn’t see why grapefruit curd wouldn’t be just as delicious…and it was. So for everyone out there who are trying to consume many grapefruit perhaps this will offer a bit of variety.

Ingredients

  • 200ml juice of grapefruit (approx 4)
  • 200g castor sugar
  • 100g butter, melted
  • 4 eggs

Method

  1. Whisk together the grapefruit juice, sugar, melted butter and eggs until they are completely combined.
  2. Pour the liquid into a heavy bottom pan which distributes heat well.
  3. Cook on a low heat and stir continuously while cooking. Do not boil the liquid otherwise you will end up with grapefruit scrambled eggs! Do not leave the liquid while cooking and always stir, preventing it from sticking to the base of the pan.
  4. Once the liquid thickens to the consistency of thick custard, pour into sterilised jars and secure with a lid.
  5. Use the curd for tarts, fillings or a spread.

Sauces, Marinades & Relishes

It has been almost a month since our last girls cooking class get together so it was good to see everyone again and get down to some action in the kitchen. We are starting the year off slowly with fortnightly classes until all the kids are back to school and everyone is back from their summer holidays.

With an abundance of stone fruit and tomatoes in season we decided to make some sauces and relishes to give everyone an idea of what they can do with any excess stock they might have over the next few months. Pictured from left to right is Tomato Cumin Relish, Thai Spice Marinade & Spicy Plum Sauce. Not pictured is the Wasabi Vinaigrette.

The Plum sauce I have used today to marinade belly pork for a BBQ but you can also use this as a dipping sauce. The Tomato Relish is also good as a dipping relish, an addition to a sandwich or you can also use as a marinade for baking fish or chicken. The Thai Spice Marinade I used for making a warm beef salad by marinading the beef prior to frying it and then adding it to salad.

Tomato Cumin Relish Ingredients – makes 3 small jars

  • 1kg tomatoes
  • 1 tbsp cumin seeds
  • 6 cardamom pods
  • ½ tbsp mustard seeds
  • 60ml vegetable oil
  • 3 cloves garlic
  • 1 tbsp grated ginger
  • 4 small chillies
  • 1 tsp turmeric powder
  • 60ml vinegar (white or cider)
  • 2 tbsp brown sugar

Method

  1. Place cumin & cardamon in a sauce pan and dry fry them for a few minutes.
  2. Remove from the pan and grind.
  3. Add oil to the pan and heat, when hot add the mustard seeds and cook for a few minutes.
  4. Add the rest of the spices to the pan and cook for a few more minutes.
  5. Add the tomatoes, sugar and vinegar and bring to the boil then turn heat down and simmer for about 45 minutes.
  6. As the liquid starts to reduce down to wards the end of the cooking, stir frequently to avoid sticking on the bottom of the pan.
  7. Pour into sterilized jars. Will keep for several weeks in sealed jars

Wasabi Vinaigrette – Ingredients

  • ½ cup or 12 tbsp olive oil
  • 4 tbsp white vinegar
  • 1 tbsp soy sauce
  • 1 tbsp wasabi paste
  • 1 tbsp Dijon mustard
  • 1 tbsp brown sugar

Method

  1. Place all the ingredients into a shake and shake to combine.
  2. Serve on salads or warm summer grilled vegetables (beans, bok choi, courgettes etc)

Thai Chilli Marinade – Ingredients

  • 1 tbsp fish sauce
  • 1 clove garlic, finely chopped
  • 1 chilli pepper, finely chopped
  • Juice of 1 lime or lemon
  • ½ cup vinegar
  • ¼ cup water
  • 1 tbsp brown sugar
  • Handful coriander, chopped
  • Handful mint, chopped

Method

  1. In a blender combine all the ingredients together and pulse well till blended.
  2. Place marinade into a pan and bring to the boil for 2 minutes.
  3. Place in sterilized jar and seal.
  4. Will keep for several weeks unopened.

Spicy Plum Sauce – Ingredients

  • 1kg plums, pitted and quartered
  • 1 small onion, quartered
  • 2 clove garlic, peeled
  • 1 cup sugar
  • 1 cups cider vinegar
  • 1 tbsp sesame oil
  • 2 tbsp soy sauce
  • 1 tablespoon grated ginger
  • 1 teaspoon ground cinnamon
  • 2 fresh chillies
  • Juice of 1 lemon

Method

  1. In a blender or food processor, process the plums, onion and garlic in batches until smooth.
  2. Transfer to a large saucepan and stir in the remaining ingredients.
  3. Bring to a boil then reduce heat; simmer for 60 minutes or until reduced by a third.
  4. Ladle hot mixture into sterilised jars.

Conserves – Cherry Almond, Apricot Cinnamon, Plum & Star Anise

As promised, here is the recipe for the Cherry Almond jam, which has a sneaky addition of Amaretto liqueur added at the end of the process. This is a really delicious jam for those who are lucky enough to have an excess of cherries, here they are $20 a kilo at the moment so not fruit you would normally make jam from if you have to buy the fruit at that price.

The stone fruit is beginning to come into season here in NZ but the first two kilos I bought of apricots and plums weren’t quite sweet or ripe enough so I turned them both into jam also, no point in wasting them!

Ingredients – Cherry Almond Jam (makes approximately 4 190ml jars)

  • 1kg Cherries, washed, halved & stoned
  • 800g sugar
  • juice of 1 lemon
  • 70g slivered almonds

Method

  1. Place all ingredients into a pan, except almonds, over a low heat until the sugar has dissolved.
  2. Increase the heat & bring ingredients to the boil and boil for 45 minutes.
  3. Add the almonds and continue to boil for 5 minutes.
  4. The jam will have reduced by this stage and will have the ‘jammy’ consistency. To test if it is ready, place ice cold water in a bowl and drop some of the jam into the water. This sets the jam quickly and will tell you what the consistency will be once bottled. If it is still runny, boil a little longer until it reaches a sticky but still runny consistency.
  5. Add the amaretto as soon as the jam is finished cooking.
  6. Store Jam in sterilised jars.

Ingredients – Plum & Cinnamon Jam (makes approximately 5 190ml jars)

  • 1kg black plums, halved & stoned
  • 800g sugar
  • juice of 1 lemon
  • 2 cinnamon sticks (optional but adds more flavour)
  • 4 star anise

Method

  1. Place all ingredients into a pan over a low heat until the sugar has dissolved.
  2. Increase the heat & bring ingredients to the boil and boil for 45 minutes.
  3. The jam will have reduced by this stage and will have the ‘jammy’ consistency. To test if i it is ready place ice cold water in a bowl and drop some of the jam into the water. This sets the jam quickly and will tell you what the consistency will be once bottled. If it is still runny, boil a little longer until it reaches a sticky but still runny consistency.
  4. Store Jam in sterilised jars.

Ingredients – Apricot & Cinnamon Jam (makes approximately 5 190ml jars)

  • 1kg apricots, halved & stoned
  • 800g sugar
  • juice of 1 lemon
  • 3 cinnamon sticks

Method – follow as above for plum jam.

English Muffins with Cherry Almond Jam

It’s New Years morning and I call out from the the bedroom hoping to get breakfast in bed…”what’s for breakfast honey?”. “There’s no bread” is the reply so that probably means P’s tea & toast is not going to happen this morning. By 7am he is already on the phone with customers since it’s business as usual for him while berry season is in full swing. So no bread and not much else in the cupboards since I’m not one to stock up on mountains of food pre Christmas & New Year, I don’t see the point since the shops are only closed for one day. Ok, so I could make my own bread… and that’s how we cam to have English muffins on New Years day. We did have them with eggs benedict that morning but that didn’t last for a photo shoot so here they are with my homemade Cherry & Almond Jam which I will post the recipe for tomorrow.
Ingredients – makes approximately 14
  • 1 cup warm milk
  • 1 cup warm water
  • 1 tablespoons white sugar
  • 1 (.25 ounce) package active dry yeast
  • 1/4 cup melted butter
  • 5 cups all-purpose flour
  • 1 teaspoon salt

Method

  1. Warm the milk and water to a luke warm temperature.
  2. Add the sugar, stirring until dissolved.
  3. Sprinkle the yeast on top of the milk and water and stand until it begins to go foamy.
  4. In a large bowl, add the milk & yeast mixture, butter and 3 cups flour.
  5. Beat until smooth. Add salt and rest of flour, or enough to make a soft dough.
  6. Knead and then leave to rest till double in size.
  7. Knead again then Roll out to about 1/2 inch thick and cut rounds with a biscuit cutter.
  8. Sprinkle waxed paper with cornmeal and set the rounds on this to rise. Dust tops of muffins with cornmeal also.
  9. Cover and let rise till doubled in size.
  10. Heat a griddle or cast iron frying pan. Cook muffins for about 10 minutes on each side on a low heat. Keep baked muffins in a warm oven until all have been cooked.
  11. Serve with your choice of topping and enjoy!

Lavender Syrup

My lavender ( lavandula angustifolia) is again in bloom and each time I step out of my front door I am welcomed by the scent of the blossoms. I have always wanted to see the lavender fields of France but we didn’t make it this year so instead we have planted more lavender along our garden fence which will keep my dreams alive until we return again to France. It’s not quite a field but there is certainly going to be an abundance once it all establishes itself so I really need to start getting creative with the herb in my cooking. A sugar syrup is really easy to make and very versatile and can be poured over ice cream, fruit tarts, in chilled teas, lemonade or as P said even using it in a cocktail or added to sparkling wine. I think he has already got his eye on one of the jars for some new summer cocktails. I mixed some into mascapone yesterday to serve with strawberries which was divine.
Ingredients – makes 2 x 190 ml jars
  • 1.5 cups water
  • 1.5 cups granulated sugar
  • 2 tablespoons fresh lavender blossoms
  • few drops of purple food colouring (optional but will stay clear without it)

Method

  1. Place al the ingredients into a pan over a low heat until the sugar has dissolved.
  2. Bring all ingredients to a boil and simmer for 5 minutes.
  3. Remove from heat and allow to steep 30 minutes.
  4. Return to the heat and bring back to the boil.
  5. Pour into sterilised jars and seal with lids.
  6. Perfect addition to ice cream, fruit tarts, lemonade, teas or cocktails.

Preserving Lemons

lemonsblog

The lemons are just starting to appear in the grocery stores in the Southern Hemisphere and the new season is offering beautiful perfect waxy bright yellow fruit. I can’t help buying them by the bagful, they seem to call out to me, they are like edible gold, I just want to take them home and bottle them all so I can enjoy them all year round. So that is what I did most of Saturday (in between surfing a few waves in a very cold sea out at Muriwai), I made jars of lemon curd, jars of lemons preserved in brine and confit lemons. As well as making some lemon coconut tarts for dinner which will follow on my next post.

For those of you who are also benefiting from the citrus season and would like also to preserve them I have set out recipes for all three below, all of which are very easy to make and such a treat once they are no longer in season and too expensive to be squeezing into a curd. Lemon curd is the English name for ‘lemon honey or lemon cheese’.

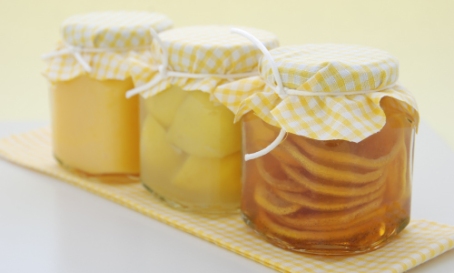
Lemon curd is the jar on the left, lemons in brine is the middle jar used for savoury Morocan dishes and the confit lemons is the jar on the right used for decorating cakes or tarts. 

Lemon Curd – Ingredients

  • 4 lemons, zest & juice
  • 200g castor sugar
  • 100g butter, melted
  • 4 eggs

Method

  1. Whisk together the lemon juice, zest, sugar, melted butter and eggs until they are completely combined.
  2. Pour the liquid into a heavy bottom pan which distributes heat well.
  3. Cook on a low heat and stir continuously while cooking. Do not boil the liquid otherwise you will end up with lemon scrambled eggs! Do not leave the liquid while cooking and always stir, preventing it from sticking to the base of the pan.
  4. Once the liquid thickens to the consistency of thick custard, pour into sterilised jars and secure with a lid.
  5. Use the curd for tarts, fillings or a spread.  

Lemons in Brine – Ingredients

  • 5  lemons
  • 145g sea salt
  • 300ml water
  • 200ml lemon juice

Method

  1. Wash, dry and sterilise jars, enough for 5 lemons.
  2. Wash and slice lemons into quarters. 
  3. Pack  the jars tightly with lemons and salt, alternating each each layer and making sure all the lemons are covered in salt.
  4. Sprinkle over any remaining salt.
  5. Combine the lemon juice and water and pour into jars ensuring that the lemons are covered completely.  
  6. Place in a cool place, away from direct sunlight, for at least 4 weeks. 
  7. Once lemons have settled in jar, you might need to add more lemon juice to ensure the lemons remain covered. 
  8. The lemons will start to soften and might start to float. As a result, they may not stay entirely covered with juice and may develop a harmless white mould. 
  1. To use, remove a lemon from brine and rinse under cold running water. Pat dry with paper towel. Use a sharp knife to cut flesh from rind. Discard flesh and pith and use the rind only. 

Confit Lemons – Ingredients

  • 6 lemons
  • 200ml water
  • 200g castor sugar
  • seeds from one vanilla bean 

Method

  1. Slice the lemons finely into rounds, discarding any seeds. 
  2. Put the sugar and water into a wide based pan on a low heat until sugar has dissolved.
  3. Add vanilla beans and lemon slices.
  4. Cook over a low heat for about 40 minutes until the lemons are  jelly like consistency. The liquid should simmer not boil.
  5. If the sugar syrup reduces too much top it up with water so that all the lemons are covered. Do not let the sugar syrup caramelise otherwise the lemons will go tough.
  6. Put the lemons and syrup into sterilised jar and and store in fridge until ready to use.  
  7. Makes about 3 small jars.

Pistachio & Almond Butter


pict00321For Everyone who loves nut betters here is a fairly simple recipe that produces a more refined tasting butter than peanut. Although I enjoy pistachio & almond butter on a fresh piece of bread my real reason for making it was to turn it into pistachio & almond ice cream (recipe posted next under ice cream). I also have a friend who has fond memories of eating pistachio ice cream back in Europe but can’t find it here so I thought I would surprise her too.


Ingredients

  • 150g pistachio, shelled
  • 70g ground almonds
  • 1 tablespoon honey
  • 1/4 cup hot water
  • 2 tablespoon olive oil

Method

  1. Blanch the pistachios in boiling water for a couple of minutes.
  2. Remove from water with a slotted spoon and place on a clean tea towel.
  3. Rub the nuts in between the tea towel to remove the brown skins.
  4. Place the pistachios, honey, oil and water in a food processor and blend till smooth. Or I found my Kenwood hand blender worked better than the food processor because of the small quantity being made it was easier to direct the concentrate the blades on where you wanted them.
  5. Add the ground almonds and blend to mix.
  6. The smoothness of the paste will depend on how robust your processor or hand blender is, or how you prefer your nut butter to be, don’t forget peanut butter comes in a variety of textures.